从 Vue2 到 Vue3 的非兼容性改变
Wed Jul 05 2023 Posted 3 years ago
最近在看《Vue.js 组件精讲》这本小册,因为完结时间比较久了,里面的内容都是基于 Vue2 来进行的,所以里面的一些内容其实是有些“过时”的,比如其中一节讲到了 $on 这个实例方法,但这个方法在 Vue3 中已经移除了。这也引发了我的思考:Vue3 相比 Vue2 具体有哪些改变?这个问题的答案其实很容易找到,Vue3 提供了非常详细的迁移指南,这篇文章也是根据指南“水”出来的。接下来就粗略地看一下有哪些需要关注的更改。
全局 API 应用实例 #
在 Vue2 中并没有"app"的概念,我们都是通过 new Vue() 来创建根实例,因此同一个 Vue 构造函数创建的每一个根实例都会共享相同的全局配置。也就是说会出现下面这种情况:
// 这会影响到所有根实例
Vue.directive('focus', {
  inserted: (el) => el.focus()
})

const app1 = new Vue({ el: '#app-1' })
const app2 = new Vue({ el: '#app-2' })
createApp() #
在 Vue3 中我们可以调用 createApp 来返回一个应用实例:
import { createApp } from 'vue'

const app = createApp({})
应用实例暴露了 Vue2 全局 API 的一个子集
| 2.x 全局 API | 3.x 实例 API (app) |
|---|---|
| Vue.config | app.config |
| Vue.config.productionTip | 移除 |
| Vue.config.ignoredElements | app.config.compilerOptions.isCustomElement |
| Vue.component | app.component |
| Vue.directive | app.directive |
| Vue.mixin | app.mixin |
| Vue.use | app.use |
| Vue.prototype | app.config.globalProperties |
| Vue.extend | 移除 |
config.productionTip 移除 #
在 Vue3 中,“使用生产版本”提示仅在使用“dev + full build”(包含运行时编译器并有警告的构建版本) 时才会显示。
config.ignoredElements 替换为 config.isCustomElement #
config.isCustomElement 现在接收一个函数作为参数,相比之前的字符串或正则表达式有更高的灵活性:
// 之前
Vue.config.ignoredElements = ['my-el', /^ion-/]

// 之后
const app = createApp({})
app.config.compilerOptions.isCustomElement = (tag) => tag.startsWith('ion-')
Vue.prototype 替换为 config.globalProperties #
在 Vue2 中, Vue.prototype 通常用于添加所有组件都能访问的 property。
在 Vue3 中与之对应的是 config.globalProperties。这些 property 将被复制到应用中,作为实例化组件的一部分。
// 之前 - Vue 2
Vue.prototype.$http = () => {}
// 之后 - Vue 3
const app = createApp({})
app.config.globalProperties.$http = () => {}
Vue.extend 移除 #
在 Vue2 中,Vue.extend 曾经被用于创建一个基于 Vue 构造函数的“子类”,其参数应为一个包含组件选项的对象。在 Vue3 中,我们已经没有组件构造器的概念了。应该始终使用 createApp 这个全局 API 来挂载组件:
// 之前 - Vue 2
const Profile = Vue.extend({
  template: '<p>{{firstName}} {{lastName}} aka {{alias}}</p>',
  data() {
    return {
      firstName: 'Walter',
      lastName: 'White',
      alias: 'Heisenberg'
    }
  }
})
// 创建一个 Profile 的实例,并将它挂载到一个元素上
new Profile().$mount('#mount-point')

// 之后 - Vue 3
const Profile = {
  template: '<p>{{firstName}} {{lastName}} aka {{alias}}</p>',
  data() {
    return {
      firstName: 'Walter',
      lastName: 'White',
      alias: 'Heisenberg'
    }
  }
}
Vue.createApp(Profile).mount('#mount-point')
挂载 App 实例 #
使用 createApp() 初始化后,应用实例 app 可通过 app.mount(domTarget) 挂载根组件实例:
const app = createApp(MyApp)

app.component('button-counter', {
  data: () => ({
    count: 0
  }),
  template: '<button @click="count++">Clicked {{ count }} times.</button>'
})

app.directive('focus', {
  mounted: (el) => el.focus()
})

// 现在,所有通过 app.mount() 挂载的应用实例及其组件树,
// 将具有相同的 “button-counter” 组件和 “focus” 指令,
// 而不会污染全局环境
app.mount('#app')
Provide / Inject #
与在 2.x 根实例中使用 provide 选项类似,Vue3 应用实例也提供了可被应用内任意组件注入的依赖项:
// 在入口中
app.provide('guide', 'Vue 3 Guide')

// 在子组件中
export default {
  inject: {
    book: {
      from: 'guide'
    }
  },
  template: `<div>{{ book }}</div>`
}
在编写插件时使用 provide 将尤其有用,可以替代 globalProperties。
在应用之间共享配置 #
在应用之间共享配置 (如组件或指令) 的一种方法是创建工厂函数,如下所示:
import { createApp } from 'vue'
import Foo from './Foo.vue'
import Bar from './Bar.vue'

const createMyApp = (options) => {
  const app = createApp(options)
  app.directive('focus' /* ... */)

  return app
}

createMyApp(Foo).mount('#foo')
createMyApp(Bar).mount('#bar')
现在,Foo 和 Bar 实例及其后代中都可以使用 focus 指令。
API 支持 TreeShaking #
webpack 和 Rollup 这样的模块打包工具都支持 tree-shaking,但 Vue2 的代码编写方式,如 Vue.nextTick() 这样的全局 API 是不支持 tree-shaking 的,所以不管它们实际上是否被使用了,都会被包含在最终的打包产物中。
在 Vue3 中,全局和内部的 API 都经过了重构,并考虑了 tree-shaking 的支持,因此全局 API 现在通过具名导出进行访问:
// 之前 - Vue 2
this.$nextTick(() => {
  // 一些和 DOM 有关的东西
})

// 之后 - Vue 3
import { nextTick } from 'vue'

nextTick(() => {
  // 一些和 DOM 有关的东西
})
受影响的 API #
Vue2 中的这些全局 API 受此更改的影响:
Vue.nextTickVue.observable(用Vue.reactive替换)Vue.versionVue.compile(仅完整构建版本)Vue.set(仅兼容构建版本)Vue.delete(仅兼容构建版本)
内部帮助器 #
除了公共 API,许多内部组件/帮助器现在也以具名的方式导出。这允许编译器只在代码被使用到时才引入并输出它。例如以下模板:
<transition>
  <div v-show="ok">hello</div>
</transition>
将编译为类似于以下的内容:
import { h, Transition, withDirectives, vShow } from 'vue'

export function render() {
  return h(Transition, [withDirectives(h('div', 'hello'), [[vShow, this.ok]])])
}
这实际上意味着只有在应用实际使用了 Transition 组件它才会被导入。换句话说,如果应用没有使用任何 Transition 组件,那么用于支持此功能的代码将不会出现在最终的打包产物中。
v-model #
以下是对变化的总体概述:
- 非兼容:用于自定义组件时,
v-modelprop 和事件默认名称已更改:- prop:
value->modelValue; - 事件:
input->update:modelValue;
- prop:
- 非兼容:
v-bind的.sync修饰符和组件的model选项已移除,可在v-model上加一个参数代替; - 新增:现在可以在同一个组件上使用多个
v-model绑定; - 新增:现在可以自定义
v-model修饰符。
2.x 语法 #
在 2.x 中,在组件上使用 v-model 相当于绑定 value prop 并触发 input 事件:
<ChildComponent v-model="pageTitle" />

<!-- 是以下的简写: -->

<ChildComponent :value="pageTitle" @input="pageTitle = $event" />
如果想要更改 prop 或事件名称,则需要在 ChildComponent 组件中添加 model 选项:
<!-- ParentComponent.vue -->

<ChildComponent v-model="pageTitle" />
// ChildComponent.vue

export default {
  model: {
    prop: 'title',
    event: 'change'
  },
  props: {
    // 这将允许 `value` 属性用于其他用途
    value: String,
    // 使用 `title` 代替 `value` 作为 model 的 prop
    title: {
      type: String,
      default: 'Default title'
    }
  }
}
所以,在这个例子中 v-model 是以下的简写:
<ChildComponent :title="pageTitle" @change="pageTitle = $event" />
使用 v-bind.sync #
在某些情况下,我们可能需要对某一个 prop 进行“双向绑定”(除了前面用 v-model 绑定 prop 的情况)。为此,我们建议使用 update:myPropName 抛出事件。例如,对于在上一个示例中带有 title prop 的 ChildComponent,我们可以通过下面的方式将分配新 value 的意图传达给父级:
this.$emit('update:title', newValue)
然后父组件可以在需要时监听该事件,并更新本地的 data property。例如:
<ChildComponent :title="pageTitle" @update:title="pageTitle = $event" />
为了方便起见,我们可以使用 .sync 修饰符来缩写,如下所示:
<ChildComponent :title.sync="pageTitle" />
3.x 语法 #
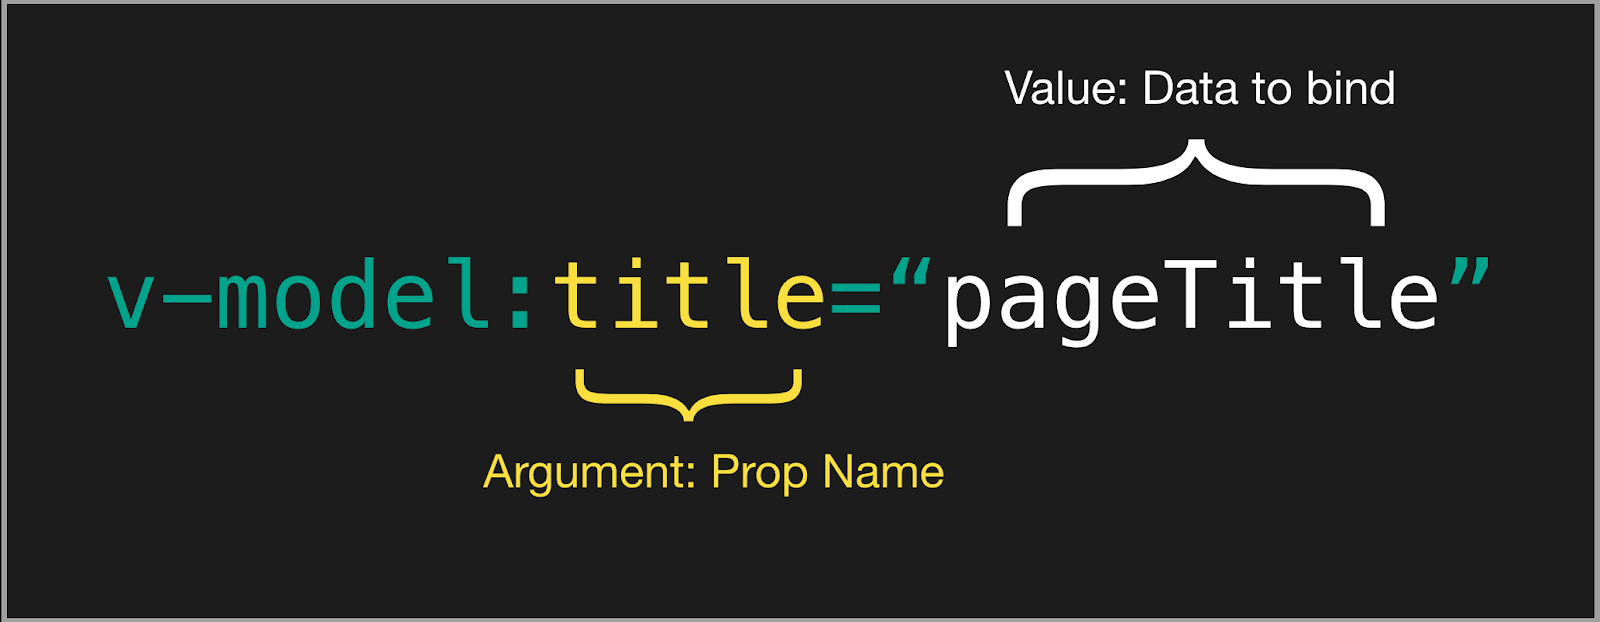
在 3.x 中,自定义组件上的 v-model 相当于传递了 modelValue prop 并接收抛出的 update:modelValue 事件:
html
<ChildComponent v-model="pageTitle" />

<!-- 是以下的简写: -->

<ChildComponent
  :modelValue="pageTitle"
  @update:modelValue="pageTitle = $event"
/>
v-model 参数 #
若需要更改 model 的名称,现在我们可以为 v-model 传递一个参数,以作为组件内 model 选项的替代:
<ChildComponent v-model:title="pageTitle" />

<!-- 是以下的简写: -->

<ChildComponent :title="pageTitle" @update:title="pageTitle = $event" />
这也可以作为 .sync 修饰符的替代,而且允许我们在自定义组件上使用多个 v-model。
<ChildComponent v-model:title="pageTitle" v-model:content="pageContent" />

<!-- 是以下的简写: -->

<ChildComponent
  :title="pageTitle"
  @update:title="pageTitle = $event"
  :content="pageContent"
  @update:content="pageContent = $event"
/>
key Attribute #
概览 #
- 新增:对于
v-if/v-else/v-else-if的各分支项key将不再是必须的,因为现在 Vue 会自动生成唯一的key。- 非兼容:如果你手动提供
key,那么每个分支必须使用唯一的key。你将不再能通过故意使用相同的key来强制重用分支。
- 非兼容:如果你手动提供
- 非兼容:
<template v-for>的key应该设置在<template>标签上 (而不是设置在它的子节点上)。
在条件分支中 #
在 Vue 2.x 中,建议在 v-if/v-else/v-else-if 的分支中使用 key。
<!-- Vue 2.x -->
<div v-if="condition" key="yes">Yes</div>
<div v-else key="no">No</div>
这个示例在 Vue 3.x 中仍能正常工作。但是我们不再建议在 v-if/v-else/v-else-if 的分支中继续使用 key attribute,因为没有为条件分支提供 key 时,也会自动生成唯一的 key。
<!-- Vue 3.x -->
<div v-if="condition">Yes</div>
<div v-else>No</div>
结合 <template v-for> #
在 Vue 2.x 中,<template> 标签不能拥有 key。不过,你可以为其每个子节点分别设置 key。
<!-- Vue 2.x -->
<template v-for="item in list">
  <div :key="'heading-' + item.id">...</div>
  <span :key="'content-' + item.id">...</span>
</template>
在 Vue 3.x 中,key 则应该被设置在 <template> 标签上。
<!-- Vue 3.x -->
<template v-for="item in list" :key="item.id">
  <div>...</div>
  <span>...</span>
</template>
v-if 和 v-for 的优先级 #
Vue2 中,在一个元素上同时使用 v-if 和 v-for 时,v-for 会优先作用。
Vue3 中,v-if 总是优先于 v-for 生效。
v-bind 的合并行为 #
2.x 语法 #
在 2.x 中,如果一个元素同时定义了 v-bind="object" 和一个相同的独立 attribute,那么这个独立 attribute 总是会覆盖 object 中的绑定。
<!-- 模板 -->
<div id="red" v-bind="{ id: 'blue' }"></div>
<!-- 结果 -->
<div id="red"></div>
3.x 语法 #
在 3.x 中,如果一个元素同时定义了 v-bind="object" 和一个相同的独立 attribute,那么绑定的声明顺序将决定它们如何被合并。
<!-- 模板 -->
<div id="red" v-bind="{ id: 'blue' }"></div>
<!-- 结果 -->
<div id="blue"></div>

<!-- 模板 -->
<div v-bind="{ id: 'blue' }" id="red"></div>
<!-- 结果 -->
<div id="red"></div>
移除 .native 修饰符 #
2.x 语法 #
默认情况下,传递给带有 v-on 的组件的事件监听器只能通过 this.$emit 触发。要将原生 DOM 监听器添加到子组件的根元素中,可以使用 .native 修饰符:
<my-component
  v-on:close="handleComponentEvent"
  v-on:click.native="handleNativeClickEvent"
/>
3.x 语法 #
v-on 的 .native 修饰符已被移除。同时,新增的 emits 选项允许子组件定义真正会被触发的事件。
因此,对于子组件中未被定义为组件触发的所有事件监听器,Vue 现在将把它们作为原生事件监听器添加到子组件的根元素中 (除非在子组件的选项中设置了 inheritAttrs: false)。
<my-component
  v-on:close="handleComponentEvent"
  v-on:click="handleNativeClickEvent"
/>
<script>
  export default {
    emits: ['close']
  }
</script>
移除函数式组件 #
概览 #
对变化的总体概述:
- 2.x 中函数式组件带来的性能提升在 3.x 中已经可以忽略不计,因此我们建议只使用有状态的组件
- 函数式组件只能由接收
props和context(即:slots、attrs、emit) 的普通函数创建 - 非兼容:
functionalattribute 已从单文件组件 (SFC) 的<template>中移除 - 非兼容:
{ functional: true }选项已从通过函数创建的组件中移除
2.x 语法 #
使用 <dynamic-heading> 组件,负责提供适当的标题 (即:h1、h2、h3 等等),在 2.x 中,这可以通过单文件组件编写:
// Vue 2 函数式组件示例
export default {
  functional: true,
  props: ['level'],
  render(h, { props, data, children }) {
    return h(`h${props.level}`, data, children)
  }
}
或者
<!-- Vue 2 结合 <template> 的函数式组件示例 -->
<script>
export default {
  props: ['level']
}
</script>

<template functional>
  <component
    :is="`h${props.level}`"
    v-bind="attrs"
    v-on="listeners"
  />
</template>
3.x 语法 #
现在,在 Vue3 中,所有的函数式组件都是用普通函数创建的。换句话说,不需要定义 { functional: true } 组件选项。
import { h } from 'vue'

const DynamicHeading = (props, context) => {
  return h(`h${props.level}`, context.attrs, context.slots)
}

DynamicHeading.props = ['level']

export default DynamicHeading
渲染函数 API #
渲染函数参数 #
2.x 语法 #
在 2.x 中,render 函数会自动接收 h 函数 (它是 createElement 的惯用别名) 作为参数:
export default {
  render(h) {
    return h('div')
  }
}
3.x 语法 #
在 3.x 中,h 函数现在是全局导入的,而不是作为参数自动传递。
import { h } from 'vue'

export default {
  render() {
    return h('div')
  }
}
VNode Prop 格式化 #
2.x 语法 #
在 2.x 中,domProps 包含 VNode prop 中的嵌套列表:
{
  staticClass: 'button',
  class: { 'is-outlined': isOutlined },
  staticStyle: { color: '#34495E' },
  style: { backgroundColor: buttonColor },
  attrs: { id: 'submit' },
  domProps: { innerHTML: '' },
  on: { click: submitForm },
  key: 'submit-button'
}
3.x 语法 #
在 3.x 中,整个 VNode prop 的结构都是扁平的:
{
  class: ['button', { 'is-outlined': isOutlined }],
  style: [{ color: '#34495E' }, { backgroundColor: buttonColor }],
  id: 'submit',
  innerHTML: '',
  onClick: submitForm,
  key: 'submit-button'
}
注册组件 #
2.x 语法 #
在 2.x 中,注册一个组件后,把组件名作为字符串传递给渲染函数的第一个参数,它可以正常地工作:
// 2.x
Vue.component('button-counter', {
  data() {
    return {
      count: 0
    }
  },
  template: `
    <button @click="count++">
      Clicked {{ count }} times.
    </button>
  `
})

export default {
  render(h) {
    return h('button-counter')
  }
}
3.x 语法 #
在 3.x 中,由于 VNode 是上下文无关的,不能再用字符串 ID 隐式查找已注册组件。取而代之的是,需要使用一个导入的 resolveComponent 方法:
// 3.x
import { h, resolveComponent } from 'vue'

export default {
  setup() {
    const ButtonCounter = resolveComponent('button-counter')
    return () => h(ButtonCounter)
  }
}
插槽统一 #
使用渲染函数时,对插槽的使用做了变更:
// Vue2
h(LayoutComponent, [
  h('div', { slot: 'header' }, this.header),
  h('div', { slot: 'content' }, this.content)
])

// Vue3
h(LayoutComponent, {}, {
  header: () => h('div', this.header),
  content: () => h('div', this.content)
})
当需要以编程方式引用作用域插槽时,它们现在被统一到 $slots 选项中了:
// 2.x 语法
this.$scopedSlots.header

// 3.x 语法
this.$slots.header()
移除 $listeners #
2.x 语法 #
在 Vue2 中,你可以通过 this.$attrs 访问传递给组件的 attribute,以及通过 this.$listeners 访问传递给组件的事件监听器。结合 inheritAttrs: false,开发者可以将这些 attribute 和监听器应用到根元素之外的其它元素:
<template>
  <label>
    <input type="text" v-bind="$attrs" v-on="$listeners" />
  </label>
</template>
<script>
  export default {
    inheritAttrs: false
  }
</script>
3.x 语法 #
在 Vue3 的虚拟 DOM 中,事件监听器现在只是以 on 为前缀的 attribute,这样它就成为了 $attrs 对象的一部分,因此 $listeners 被移除了。
<script>
export default {
  inheritAttrs: false
}
</script>

<template>
  <label>
    <input type="text" v-bind="$attrs">
  </label>
</template>
如果这个组件接收一个 id attribute 和一个 v-on:close 监听器,那么 $attrs 对象现在将如下所示:
{
  id: 'my-input',
  onClose: () => console.log('close 事件被触发')
}
class & style 包含在 $attrs 中 #
2.x 行为 #
Vue2 的虚拟 DOM 实现对 class 和 style attribute 有一些特殊处理。因此,与其它所有 attribute 不一样,它们没有被包含在 $attrs 中。
上述行为在使用 inheritAttrs: false 时会产生副作用:
$attrs中的 attribute 将不再被自动添加到根元素中,而是由开发者决定在哪添加。- 但是
class和style不属于$attrs,它们仍然会被应用到组件的根元素中:
<script>
export default {
  inheritAttrs: false
}
</script>

<template>
  <label>
    <input type="text" v-bind="$attrs">
  </label>
</template>
像这样使用时:
<my-component id="my-id" class="my-class"></my-component>
将生成以下 HTML:
<label class="my-class">
  <input type="text" id="my-id" />
</label>
3.x 行为 #
$attrs 包含了所有的 attribute,这使得把它们全部应用到另一个元素上变得更加容易了。现在上面的示例将生成以下 HTML:
<label>
  <input type="text" id="my-id" class="my-class" />
</label>
prop 默认值工厂函数不再能访问 this #
生成 prop 默认值的工厂函数不再能访问 this。
取而代之的是:
- 组件接收到的原始 prop 将作为参数传递给默认函数;
- inject API 可以在默认函数中使用。
import { inject } from 'vue'

export default {
  props: {
    theme: {
      default (props) {
        // `props` 是传递给组件的、
        // 在任何类型/默认强制转换之前的原始值,
        // 也可以使用 `inject` 来访问注入的 property
        return inject('theme', 'default-theme')
      }
    }
  }
}
自定义指令 #
2.x 语法 #
在 Vue2 中,自定义指令通过使用下列钩子来创建,以对齐元素的生命周期,它们都是可选的:
- bind - 指令绑定到元素后调用。只调用一次。
- inserted - 元素插入父 DOM 后调用。
- update - 当元素更新,但子元素尚未更新时,将调用此钩子。
- componentUpdated - 一旦组件和子级被更新,就会调用这个钩子。
- unbind - 一旦指令被移除,就会调用这个钩子。也只调用一次。
下面是一个例子:
<p v-highlight="'yellow'">以亮黄色高亮显示此文本</p>
Vue.directive('highlight', {
  bind(el, binding, vnode) {
    el.style.background = binding.value
  }
})
此处,在这个元素的初始设置中,通过给指令传递一个值来绑定样式,该值可以在应用中任意更改。
3.x 语法 #
在 Vue3 中,我们为自定义指令创建了一个更具凝聚力的 API:
- created - 新增!在元素的 attribute 或事件监听器被应用之前调用。
- bind → beforeMount
- inserted → mounted
- beforeUpdate:新增!在元素本身被更新之前调用,与组件的生命周期钩子十分相似。
- update → 移除!该钩子与
updated有太多相似之处,因此它是多余的。请改用updated。 - componentUpdated → updated
- beforeUnmount:新增!与组件的生命周期钩子类似,它将在元素被卸载之前调用。
- unbind -> unmounted
最终的 API 如下:
const MyDirective = {
  created(el, binding, vnode, prevVnode) {}, // 新增
  beforeMount() {},
  mounted() {},
  beforeUpdate() {}, // 新增
  updated() {},
  beforeUnmount() {}, // 新增
  unmounted() {}
}
因此,API 可以这样使用,与前面的示例相同:
<p v-highlight="'yellow'">以亮黄色高亮显示此文本</p>
const app = Vue.createApp({})

app.directive('highlight', {
  beforeMount(el, binding, vnode) {
    el.style.background = binding.value
  }
})
边界情况:访问组件实例 #
通常来说,建议在组件实例中保持所使用的指令的独立性。从自定义指令中访问组件实例,通常意味着该指令本身应该是一个组件。然而,在某些情况下这种用法是有意义的。
在 Vue2 中,必须通过 vnode 参数访问组件实例:
bind(el, binding, vnode) {
  const vm = vnode.context
}
在 Vue3 中,实例现在是 binding 参数的一部分:
mounted(el, binding, vnode) {
  const vm = binding.instance
}
mixin 中 data 的合并行为变更 #
当来自组件的 data() 及其 mixin 或 extends 基类被合并时,合并操作现在将被浅层次地执行:
const Mixin = {
  data() {
    return {
      user: {
        name: 'Jack',
        id: 1
      }
    }
  }
}

const CompA = {
  mixins: [Mixin],
  data() {
    return {
      user: {
        id: 2
      }
    }
  }
}
在 Vue 2.x 中,生成的 $data 是:
{
  "user": {
    "id": 2,
    "name": "Jack"
  }
}
在 3.0 中,其结果将会是:
{
  "user": {
    "id": 2
  }
}
过渡的 class 名更改 #
过渡类名 v-enter 修改为 v-enter-from、过渡类名 v-leave 修改为 v-leave-from。
// Vue2
.v-enter,
.v-leave-to {
  opacity: 0;
}

.v-leave,
.v-enter-to {
  opacity: 1;
}

// Vue3
.v-enter-from,
.v-leave-to {
  opacity: 0;
}

.v-leave-from,
.v-enter-to {
  opacity: 1;
}

<transition> 组件的相关 prop 名称也发生了变化:
leave-class已经被重命名为leave-from-class(在渲染函数或 JSX 中可以写为:leaveFromClass)enter-class已经被重命名为enter-from-class(在渲染函数或 JSX 中可以写为:enterFromClass)
TransitionGroup 不再默认渲染根元素 #
在 Vue2 中,<transition-group> 像其它自定义组件一样,需要一个根元素。默认的根元素是一个 <span>,但可以通过 tag attribute 定制。
<transition-group tag="ul">
  <li v-for="item in items" :key="item">
    {{ item }}
  </li>
</transition-group>
在 Vue3 中,我们有了 Fragment,因此组件不再需要根节点。所以,<transition-group> 不再默认渲染根节点,但它依旧保留了 tag 属性来渲染根节点。
<transition-group tag="span">
  <!-- -->
</transition-group>
侦听数组的回调触发条件变更 #
在Vue3 中使用 watch 侦听数组时,只有在数组被替换时才会触发回调。换句话说,在数组被改变时侦听回调将不再被触发。要想在数组被改变时触发侦听回调,必须指定 deep 选项。
watch: {
  bookList: {
    handler(val, oldVal) {
      console.log('book list changed')
    },
    deep: true
  },
}
被挂载的应用不会替换元素 #
在 Vue2 中,如果我们将一个具有 template 的应用挂载到元素上时,被挂载的元素会被替换为模板内容:
new Vue({
  el: '#app',
  template: `
    <div id="rendered">Hello</div>
  `
})
<!-- 挂载前 -->
<body>
  <div id="app">
    Some app content
  </div>
</body>

<!-- 挂载后 -->
<body>
  <div id="rendered">Hello</div>
</body>
在 Vue3 中则会将模板渲染为挂载元素的 innerHTML:
const app = Vue.createApp({
  template: `
    <div id="rendered">Hello</div>
  `
})

app.mount('#app')
<body>
  <div id="app" data-v-app="">
    <div id="rendered">Hello</div>
  </div>
</body>
不再支持 keyCode 作为 v-on 的修饰符 #
Vue2 中我们可以使用 keyCodes 作为修饰符来修改 v-on 方法:
<input v-on:keyup.13="submit" />
但 Vue3 中不再支持 keyCode 修饰符,因为 KeyboardEvent.keyCode 已经被废弃。现在建议对任何要用作修饰符的键使用 kebab-cased (短横线) 名称:
<input v-on:keyup.page-down="nextPage">
<!-- 同时匹配 q 和 Q -->
<input v-on:keypress.q="quit">
移除 propsData #
在 Vue2 中,我们可以在创建 Vue 实例的时候传入 prop:
const Comp = Vue.extend({
  props: ['username'],
  template: '<div>{{ username }}</div>'
})

new Comp({
  propsData: {
    username: 'Evan'
  }
})
而在 Vue3 中 propsData 选项已经被移除了。如果需要在实例创建时向根组件传入 prop,应该使用 createApp 的第二个参数:
const app = createApp(
  {
    props: ['username'],
    template: '<div>{{ username }}</div>'
  },
  { username: 'Evan' }
)
其他的小改动 #
destroyed生命周期选项被重命名为unmountedbeforeDestroy生命周期选项被重命名为beforeUnmount- 没有特殊指令的标记 (
v-if/else-if/else、v-for或v-slot) 的<template>现在被视为普通元素,并将渲染为原生的<template>元素,而不是渲染其内部内容。 - 生命周期的
hook:事件前缀改为vue: - 移除
$on、$off和$once实例方法 - 移除过滤器(
filter) - 移除对内联模板特性的支持
- 移除实例的
$children属性 - 移除
$destroy实例方法。用户不应该再手动管理单个 Vue 组件的生命周期。 - 全局函数
set和delete以及实例方法$set和$delete。基于代理的变化检测已经不再需要它们了。